Your computer might become unbootable as a result of a bad pool header. Then try one of the solutions mentioned in this article to fix the bad pool header error.
What Is Bad Pool Header 0x00000019?
BAD POOL HEADER 0x00000019 is a BSOD error that happens when Windows encounters a hardware issue with the hard drive that contains the Windows operating system. This hardware issue can be caused by aging or faulty system components like the hard drive and RAM and corrupt device drivers, and missing system files.
And when this occurs, the file you are working on normally ends up being fatal – it could be a video project, an important document, or a presentation, for instance.
Occasionally, the file becomes infected, and other times, the file disappears or the changes made are lost. It also causes file system errors and drives to become corrupted.
What Causes Bad Pool Header 0x00000019 Error?
Windows memory allocation problems usually trigger the bad pool header 0x00000019 error. Simply put, this problem usually arises after installing new hardware or software that does not fit with the computer, particularly antivirus software. Faulty drivers and routers can also cause windows bad pool header and other disks write issues.
Then you may question how to deal with this awful problem.
We conducted research and implemented a variety of solutions to address the problem of a bad pool header. Now, in the following content, we will walk you through step-by-step solutions to resolve this issue.
How to Fix Bad Pool Header 0x00000019 Error?
In this section, we will show you how to fix a bad pool header in Windows 10. The operations are identical if you are using another Windows operating system.
If your computer is unable to boot normally, you will need to Boot Windows in Safe Mode, which will help you troubleshoot the error and possibly find the root cause.
You can go through all of the following options first and then determine which one or more of them can help you with the bad pool header issue.
Solution 1: Uninstall Recently installed Programs
If, by any chance, before getting the bad pool header error, you installed any new program on your computer, we recommend you uninstall recently install programs, restart your PC and then check to see if it resolved the issue. And to do so, follow the step mentioned below.
Go to Control Panel > Programs and Features after right-clicking on the Start button. After that, you can see the following interface. To uninstall the program, right-click on the target program and choose Uninstall from the menu that appears.
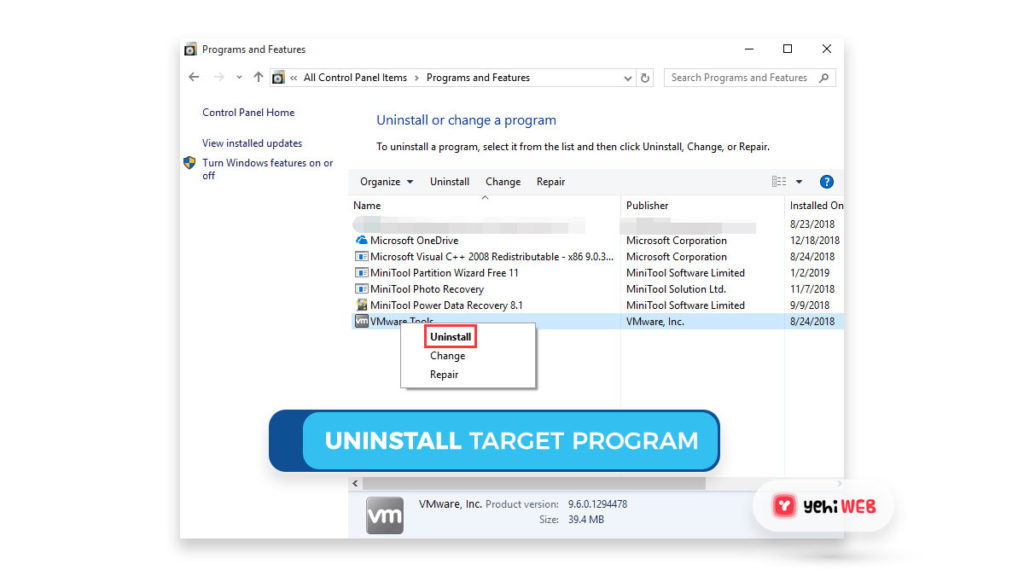
Finally, restart the computer to see if the Windows bad pool header error is resolved.
Solution 2: Uninstall Any Recently installed Hardware
Similar to the solution mentioned above, if before getting the bad pool header error, you installed any hardware. We recommend uninstalling any recently installed hardware from the Device Manager. To do so, please follow the step mentioned below:
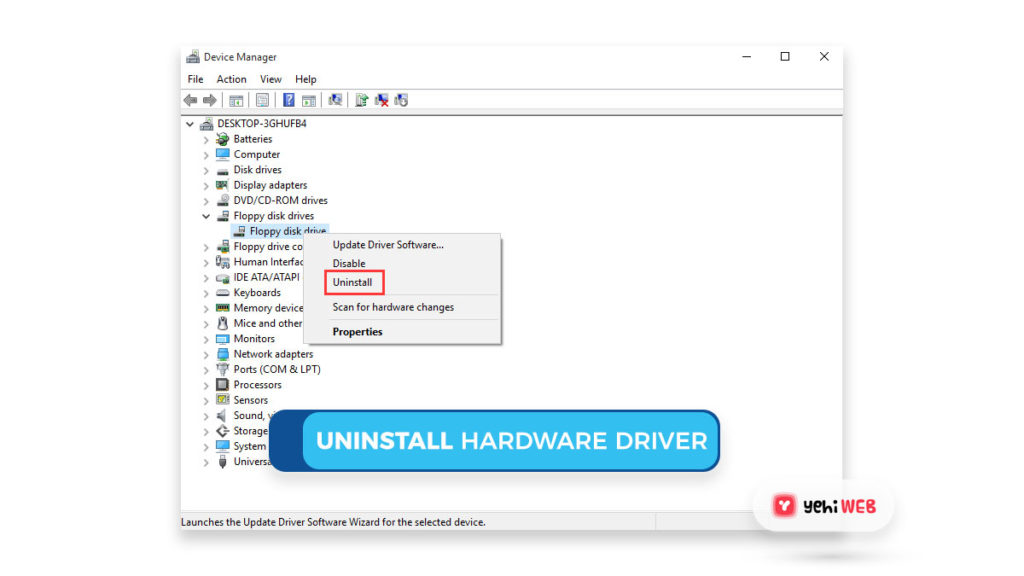
Right-click on the Start button and select Device Manager from the drop-down menu. Righ-Click on the target and Hardware and click uninstall from the drop-down menu.
After you are done uninstalling recently installed hardware, restart your computer and check if the bad pool header error is resolved.
Solution 3: Unmount External Devices
External devices that are interfering with the system may be one cause of the bad pool header error. Except for the keyboard and mouse, you should unmount all peripherals and external devices. After that, restart the computer to see if the problem has been resolved. If this solution is not working for you, keep reading to explore other solutions.
Solution 4: Turn Off Fast Startup Feature
If the Fast Startup option is turned on by default, it can cause problems with the system, resulting in a bad pool header error. In this case, turn off the fast startup feature. Navigate to Control Panel > Power Options > Choose What The Power Button Do, from under Shutdown settings options, uncheck turn on fast startup.
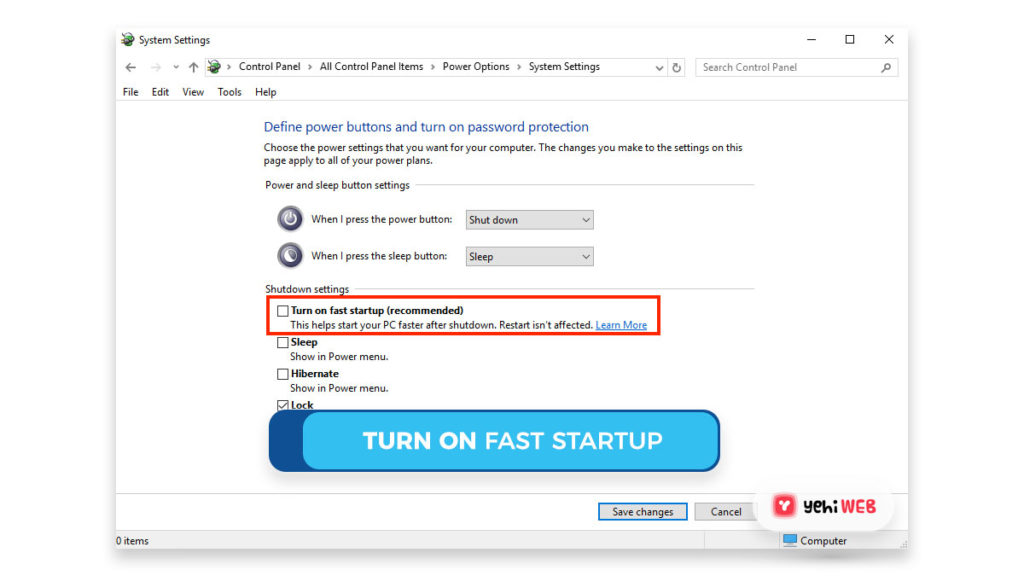
Click Saves changes to apply changes to the system. And Restart your computer to check if the bad pool header error is resolved.
Solution 5: Manually Update Device Drivers
While Windows Update can automatically update all drivers, it may not always work.
Faulty drivers may often result in a bad pool header issue. You should manually update the drivers in this case. To do so, go to Device Manager, right-click on the individual driver, and select Update Driver Software from the menu. Then, one by one, repeat these steps to update all of the drivers.
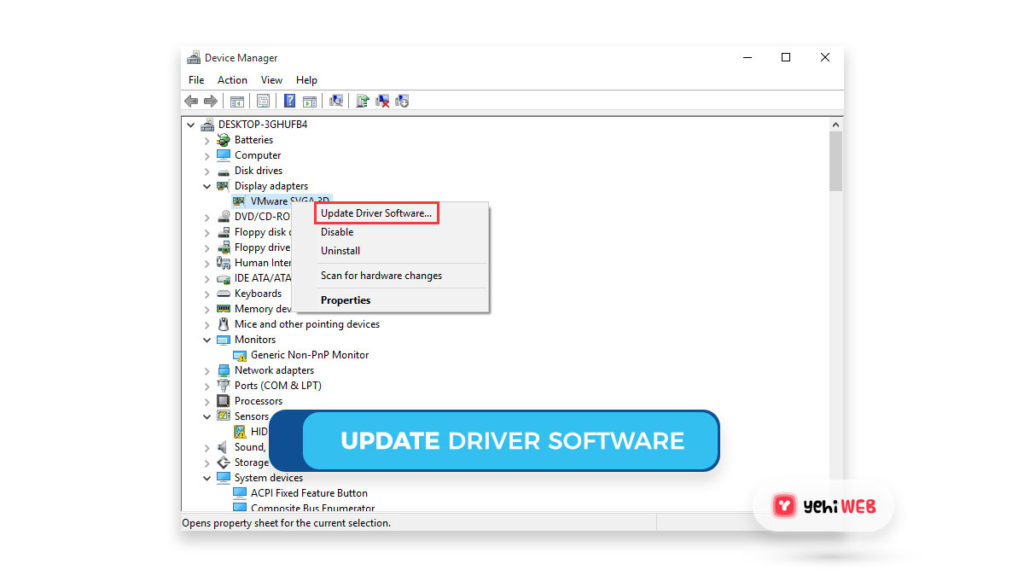
Please restart the computer after all updates are done to see if the bad pool header issue has been resolved.
Solution 6: Perform Clean Boot
If the above solution does not resolve the issue, try performing a Clean Boot to see if it will resolve the bad pool header error.
To do so, right-click the Start button and select Run from the menu that appears. Then, in the run box, type MSConfig and press Enter to open the System Configuration interface, as seen below. Continue to the General interface and choose Selective startup from the Startup selection.
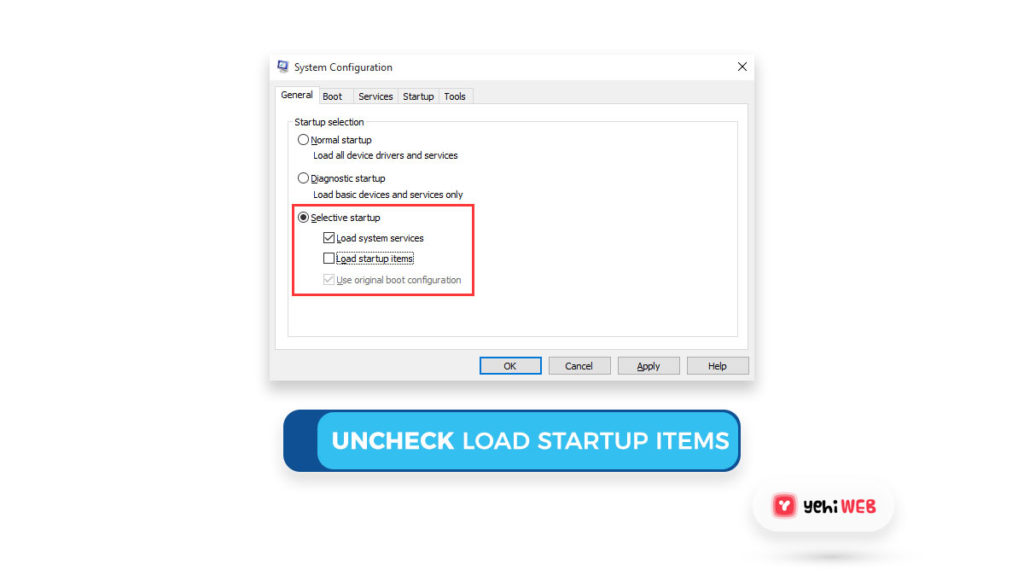
Uncheck Load startup items, and then check all Load system services and Use the original boot configuration.
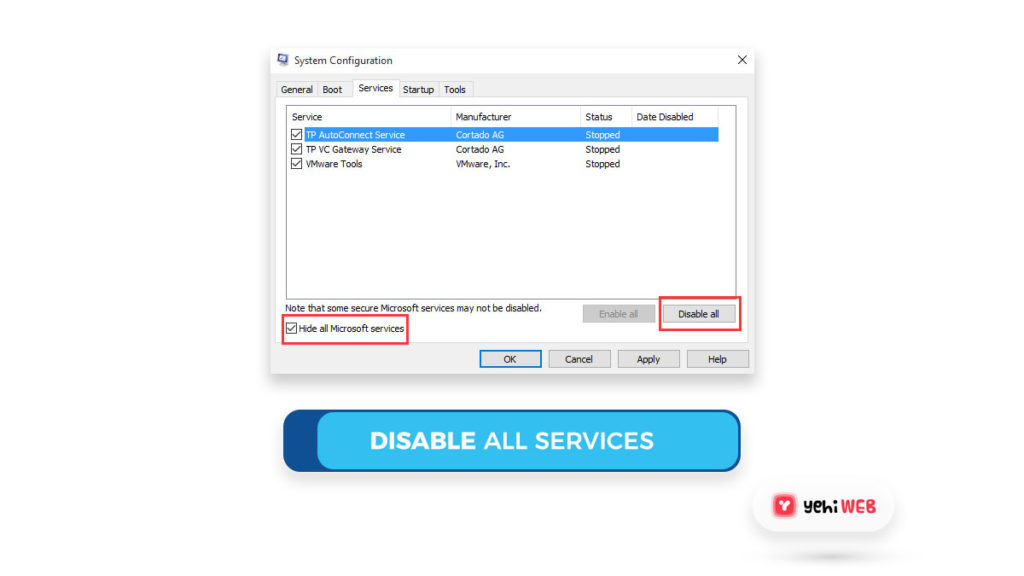
After that, go to the Services tab, check to Hide all Microsoft services, and then click Disable all.
Then Click Apply for changes to take effect and Ok to close the window. Finally, restart the computer so, windows can enter the Clean Boot State. If the issue is no longer there, the error is likely caused by non-Microsoft processes. Then you will have to identify the culprit manually.
Solution 7: Disable Uneccessory Hardware Components
A Hardware Clean Boot, unlike a regular Clean Boot, requires disabling hardware components that are not necessary for a system to run in the Device Manager. To start, press the Win+R keys to open the Run window. Then, to open the Device Manager, type devmgmt.msc and press Enter. Disable the following drivers:
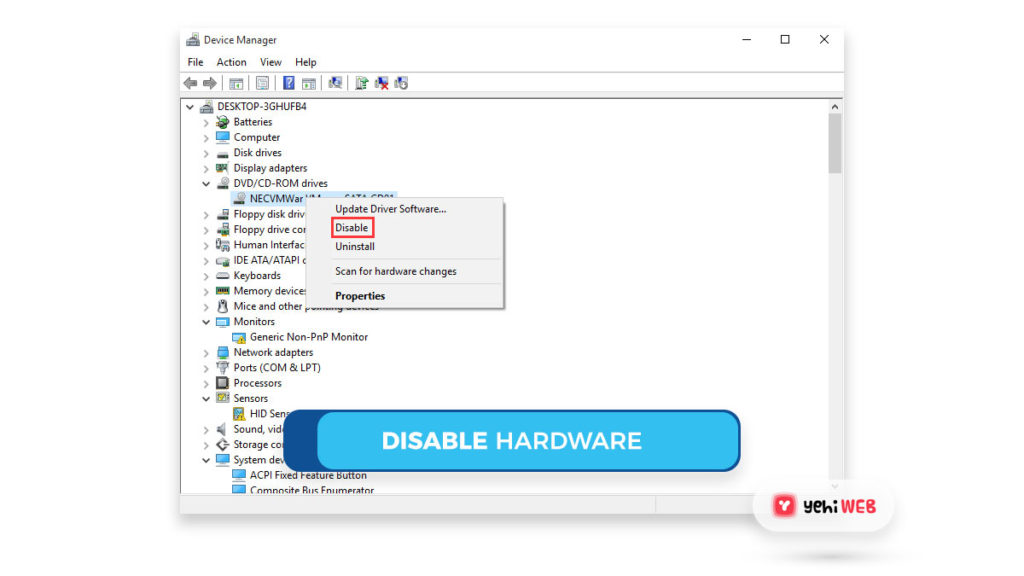
Disable the following drivers:
- Ports
- Modems
- Network Adapters
- Video, Sound, and Game Controllers
- DVD/CD-ROM
- Display Adapters
- USB Devices and Controller
To do so, Right Click on the target driver and choose to disable it from the pop-up menu list. After that, restart the system and see if the bad pool header error has been resolved. If it is resolved, then one of your hardware components is the main culprit for causing a bad pool header error. To identify it, re-enable drivers one by one and restarting your PC frequently to check if the error comes back up with any specific device enabled.
Solution 8: Diagnose your computer’s memory problems
Memory Diagnostic Tool is a built-in tool in Windows 10/8/7 that will help you search for possible memory problems, including checking the computer’s Random Access Memory (RAM). Please follow these steps to open and use this tool:
- Launch Control Panel. Then, in the upper right corner Search window, type memory and press Enter.
- Then, from the search results, choose to Diagnose your computer’s memory problems under Administrative Tools, and the Windows Memory Diagnostic interface will appear. To proceed, select the Restart now and search for the problems (recommended) option.
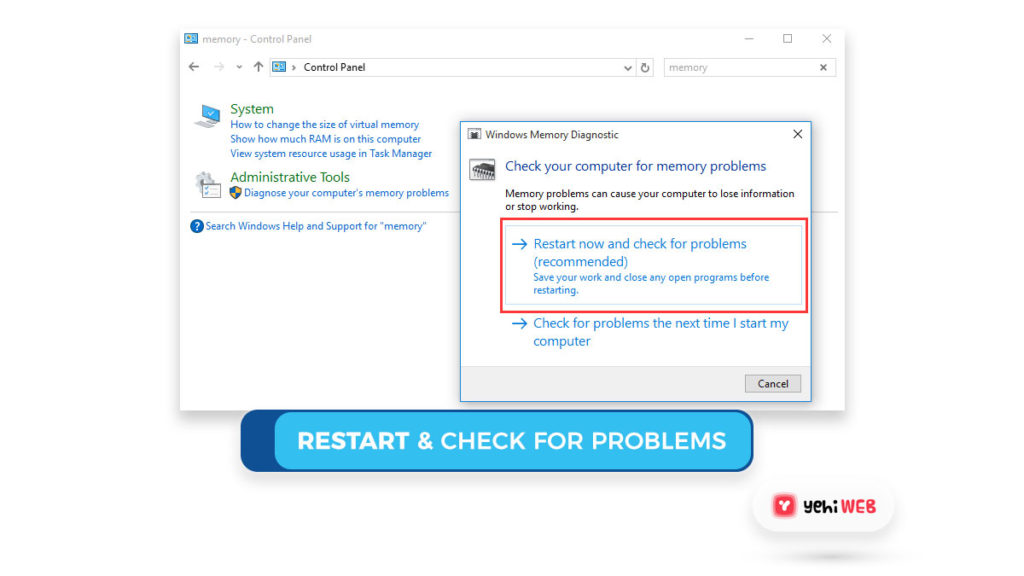
- The computer will restart, and then the Windows Memory Diagnostics Tool will automatically scan for memory problems.
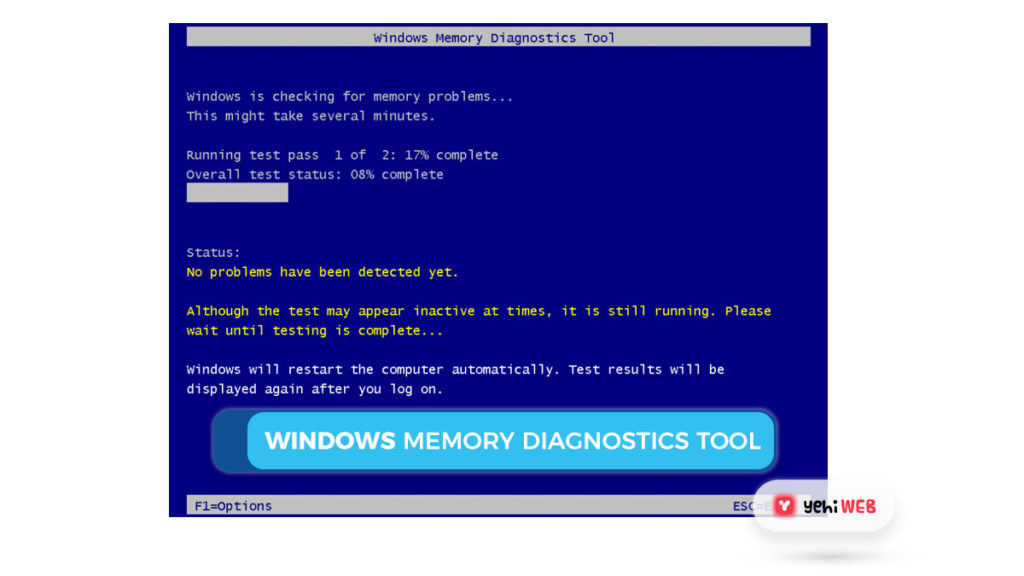
When the checking procedure is complete, open the Event Viewer and search for the MemoryDiagnostics-Results entry to see the results. If this tool detects errors, you can call the computer manufacturer for assistance since memory errors typically signify a fault with your computer’s memory chips or another hardware problem.
Conclusion
Saad Shafqat
Related posts
New Articles
What Does Tournament Mean in Duolingo Diamond League?
Duolingo’s Diamond League is the highest league in the app’s competitive ranking system. If you’ve made it here, congratulations! But…

![How to Fix Bad Pool Header In Windows 10/8/7 [ Ultimate Guide ]](https://yehiweb.com/wp-content/uploads/2021/05/How-to-Fix-Bad-Pool-Header-In-Windows-10-8-7-Yehiweb-1200x675.jpg)
