
GIFs are a popular and entertaining way to communicate on the internet. GIFs are short, punchy, and sometimes hilarious. But how do you go about making one? We’ll show you How to create a GIF from an online video in this article.
What is a GIF?
So, you want to know what a GIF is, right?
A GIF (pronounced “gif” or “jiff”) is simply an image file in its simplest form. The GIF format, like the JPEG and PNG file formats, can be used to create still images. The GIF format, on the other hand, has a unique feature: it can be used to create animated images like the one below.
Until PNG became a viable alternative, it was the internet’s standard for 8-bit color images. You’ve probably seen them in a lot of email signatures.
Animated GIFs are made up of multiple images or frames that have been combined into a single file. To create short low-file-size animations, they are displayed in succession with varying frame rates. GIFs are designed to end on the last frame by default, but they are increasingly being seen looping.
GIFs are widely used as emotive reactions on blogs, social media, and instant messaging apps.
Why Are GIFs Becoming More Popular?

GIFs are Becoming More Popular because, like memes, they can be used to convey jokes, emotions, and ideas. Plus, services like GIPHY and Gyfcat make sharing and creating GIFs a breeze. With the services being integrated into apps like Twitter and Facebook Messenger, as well as the keyboard on your phone, making them as easy to use as emojis or “stickers.”
The GIF format has been attempted to be replaced. They always fall short. Mozilla’s APNG (animated PNG) format was created ten years ago to replace GIF, but it failed miserably. There are many reasons why GIF has survived, but for the sake of time, we’ll just give you the three main ones now:
Every browser is different: Browsers have their quirks, and one bad browser can sometimes stop the web from progressing. Do you require a specific example? Although Mozilla’s APNG format was released in 2008, Microsoft’s Edge browser only started supporting it this year. (If this animation doesn’t work, it’s because you’re using an out-of-date variant of the Edge browser.) For a long time, all browsers have welcomed animated GIFs.
HTML didn’t support video: Prior to HTML5, which was released in 2014, the HTML standard did not support video. Since it was easier to post GIFs than it was to share individual images, GIFs remained popular. Many websites used Adobe’s Flash plug-in to display images, but Flash was incompatible with mobile devices such as iPhones.
It’s easy to make a GIF: GIFs Are Simple to Create: Why go for a new format when GIFs are so easy to create? GIF-making websites have existed for eons, and GIFs can be created with almost any picture editing software.
Why Use a GIF?
GIFs are short, seldom lasting more than 5 seconds, and have small file sizes, so they don’t slow down the loading of web pages. Scenes that become GIFs typically convey feelings in a major, recognizable manner, so they’re usually charged with emotion.
There’s no way to misinterpret this scene as anything other than exciting. GIFs are a visual representation of the shared stories that we ingest. Sharing a scene from a particular show or video elicits feelings associated with the movie and strengthens the point. They also immediately bind us to other pop culture aficionados for those of us who watch just too much tv.
Why not use a GIF to make an instant emotional connection with the audience?
How to create a GIF from a video?
Though there are many ready-made GIFs on sites like Giphy, creating your own is relatively easy. Let’s look at a few different solutions, each of varying degrees of complexity. A GIF creator can be used on a Mac, PC, or mobile device.
How to Create a GIF with Giphy?
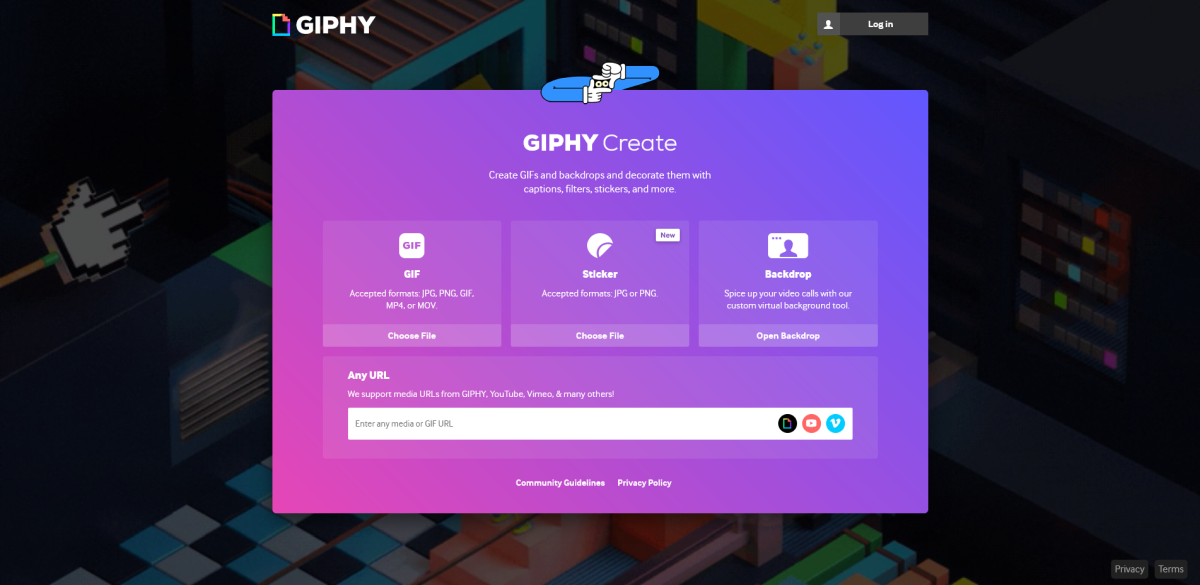
Giphy is a gif creator that is incredibly fast and simple to use. Although the GIF isn’t especially sophisticated, it only took us less than 3 minutes to create, despite the time it took to find the YouTube video.
Follow the steps mentioned below to create yours now:
1. In the top right corner, click “Create.”
You can create a GIF by uploading your own video file by using the video URL from a video hosting platform like YouTube or Vimeo.
2. Create your GIF
Choose the duration of the GIF and the start time. Tags and captions can also be added. When you’re finished, go to the bottom of the page and click “Create GIF.”
3. Share your GIF on social media
Giphy makes creating a GIF extremely easy and quick. You are not required to create an account. Find a video on YouTube or directly upload one to Giphy, set the start and end times, and you’re ready to go!
Create a GIF via Make a GIF
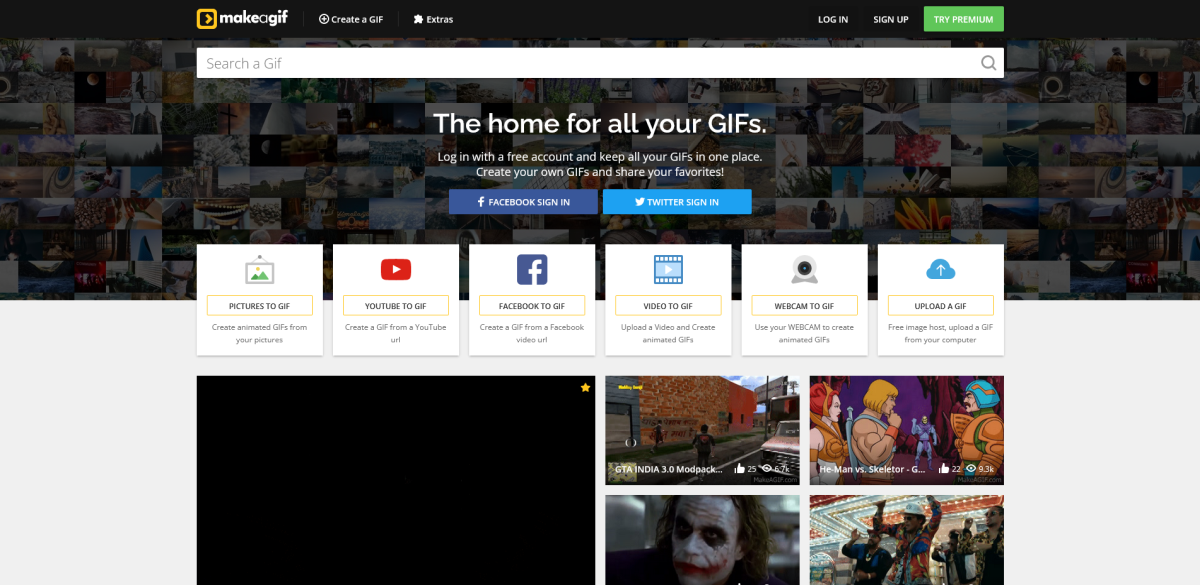
Make a GIF might be the one for you if you’re looking for a slightly more sophisticated yet similarly simple GIF creator. Create a new account or sign up with your Twitter or Facebook account. Make a GIF can be used to create high-quality animated GIFs from the following sources:
- Pictures
- YouTube videos
- Facebook videos
- An Uploaded video of yours
- Webcam
Let’s take a look at how to create a GIF using a YouTube video.
1. Click “YouTube to GIF” from your Make a GIF account.
2. Type in the Youtube URL
3. You’ll be taken to the GIF creation page from there.
Drag the cursor to the appropriate time for the start of your GIF. Then, using the “GIF Length” cursor, choose the desired length. Your GIF can last up to ten seconds.
Tags, categories, and stickers can all be added. You can also opt to have audio switched on. You can make HD GIFs and remove the watermark if you upgrade to the premium edition, but the free version is enjoyable, simple to use, and decent enough to get you started.
After less than 5 minutes, I came up with this GIF. In my defense, the majority of the time was spent deciding the clip to use.
Create a GIF with Photoshop

Photoshop is the obvious winner when it comes to gaining the most power over your GIF formation. We’ll assume you’re fairly tech-savvy if you’re using Photoshop, so we’ll just show you the basics of how to do it.
1. Launch Photoshop (we’re using Photoshop CC 2017 for this example).
2. Navigate to File → Import → Video Frames to Layers.
3. Change the settings in the dialogue box to choose which section of the video you wish to use (use the sliders under the thumbnail to set the frame range), or lower the frame rate to save file space. Make sure the box marked “Make Frame Animation” is checked, then click “OK.”
4. Navigate to File → Import → Save for Web (Legacy). (File → Save for Web in previous versions.)
5. There are so many options! You can reduce the file size by adjusting the number of colors or the Image Size options, but if you’re impatient and don’t care how huge your GIF is, just press save, and you’re finished. It’s easy.
That’s it! You’re done creating your very own GIF.
GIFs allow for more casual social media communication. They can be used to create a comedic effect and demonstrate a friendly, likable company culture. So, what exactly are you waiting for? Create a GIF now.

How to Self-Host n8n on Hostinger: Complete Setup Guide
Self-hosting n8n on Hostinger is a practical way to run automation workflows under your own control, with predictable server resources…