Windows 10 Safe Mode is an essential diagnostic tool for identifying and resolving potential causes of Windows 10 PC issues. This article explains How To Boot Windows 10 In Safe Mode to troubleshoot problems with your Windows 10 PC in different ways, each with step-by-step instructions.
What Is Windows 10 Safe Mode and How Does It Work?
Safe Mode is a built-in diagnostic mode in the Windows 10 computer operating system (7, 8, etc.). When you start your Windows 10 computer in Safe Mode, it will only allow you to run basic system programs and services during the boot phase. Safe Mode on a Windows 10 computer is a stripped-down variant of the operating system.
Windows 10 Safe Mode is intended to assist users in troubleshooting most issues with the Windows 10 operating system. It is most often used to get rid of viruses and ransomware from computers.
In Windows 10 Safe Mode, the operating system can boot up with only the most essential drivers and services enabled, such as video drivers and sound. Loading of third-party startup programs is also disabled. As a result, it is easier to pinpoint the source of operating system issues.
For example, you can start Windows 10 in Safe Mode to see if the misbehaving Windows 10 PC is caused by the default settings and drivers or to see if the installation of poorly configured software/programs prevents Windows 10 PC booting in a normal state. Windows 10 Safe Mode helps you to safely uninstall applications, fix driver problems, diagnose hardware conflicts, and more.
Furthermore, if you cannot start your Windows 10 PC normally, you can start it in Safe Mode. As a result, it is a decent choice for troubleshooting PC issues like blue screens and black screens caused by ransomware, virus infections, or outdated hardware drivers.
When Do You Need To Boot Windows 10 In Safe Mode?
If your Windows 10 PC seems to be having issues, is not functioning properly, keeps crashing/freezing, or sometimes displays a blue screen/black screen, you can try booting Windows 10 in Safe Mode to resolve any Windows 10 issues.
Types Of Windows 10 Safe Mode
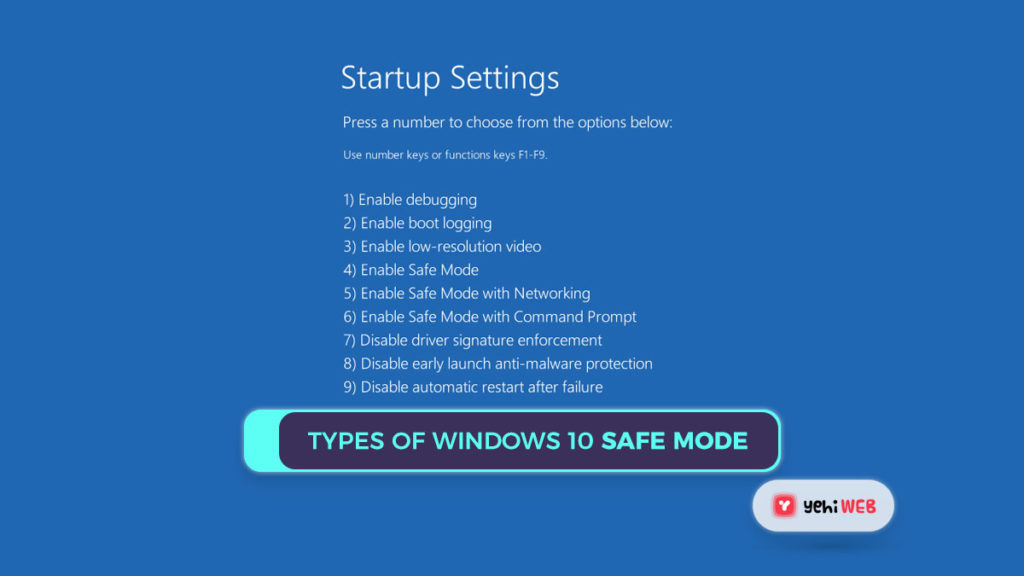
Safe Mode in Windows 10 comes in three types. Depending on your needs, you can boot Windows 10 into any Safe Mode.
- Enable Safe Mode: Safe Mode in this type is the most basic. It starts Windows 10 by launching the system’s main settings and services. Windows will not enable unnecessary programs, drivers, or utilities. This makes the PC secure by preventing malware or viruses from spreading through third-party applications, drivers, or local networks.
- Enable Safe Mode with Networking: If you want to start Windows 10 in safe mode with networking, it will install additional drivers and services needed to connect to networks while retaining the Safe Mode drivers and services. This is not as secure as Safe Mode, but it comes in handy when you need to go online.
- Enable Safe Mode with Command Prompt: Your computer can display a big Command Prompt window if you want to boot Windows 10 in Safe Mode with Command Prompt. Professionals can quickly resolve issues with Windows 10 PCs by using command lines. It is not recommended to use this alternative if you are unfamiliar with CMD. The network is not accessible in either Safe Mode or Safe Mode with Command Prompt.
Let us get right to the point: Following are the ways to start Windows 10 in Safe Mode: Settings, MSConfig (System Configuration), Start menu, F8 key, sign-in screen, black/blank screen.
1. Boot Windows 10 in Safe Mode From Settings
If you have already signed into your Windows 10 computer, you can use the Advanced Startup feature to boot into Safe Mode. Follow the steps mentioned below to do so:
Step 1: Go To Windows Settings
On a Windows 10 PC, go to the Start menu and select Settings. Alternatively, you can press Windows + I key on the keyboard to open Windows settings as well.
Step 2: Go to the Startup Settings Window
To enter Windows RE, go to Update & Security, select Recovery from the left panel, and then click Restart now under Advanced startup (Recovery Environment).
Then select Troubleshoot -> Advanced options -> Startup Settings -> Restart.
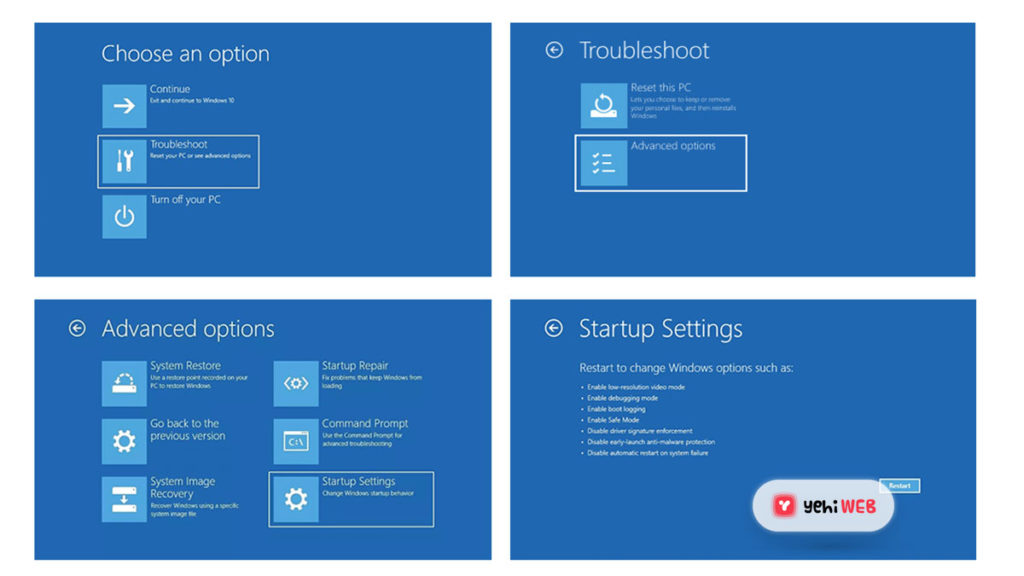
Step 3: Choose your Preferred Safe mode option
To Boot Windows 10 in Safe Mode, select your preferred Safe Mode option.
- To Boot Windows 10 in Safe Mode, press 4 or F4 on the keyboard;
- to Boot Windows 10 in Safe Mode with Networking,
- press 5 or F5 on the keyboard; and Boot Windows 10 in Safe Mode with Command Prompt,
- press 6 or F6 on the keyboard.
2. Boot Windows 10 In Safe Mode through MSConfig
If you can get into the Windows 10 system, you can also use the Windows System Configuration (msconfig.exe) utility to boot into Safe Mode in Windows 10. Again follow the steps mentioned below to do so:
Step 1: Open System Configuration Utility
To open the System Configuration utility, press Windows + R, type MSConfig in the Windows RUN window, and click Enter.
Step 2: Choose Your Preferred Safe Boot Option
Then choose the Boot tab. You can choose your preferred Safe boot option under Boot preferences depending on your needs.
- Minimal is the same as Safe Mode.
- Safe Mode with Command Prompt is referred to as Alternate Shell.
- Safe Mode of Networking is referred to as Network.
- The Active Directory server is repaired using the Active Directory repair option.
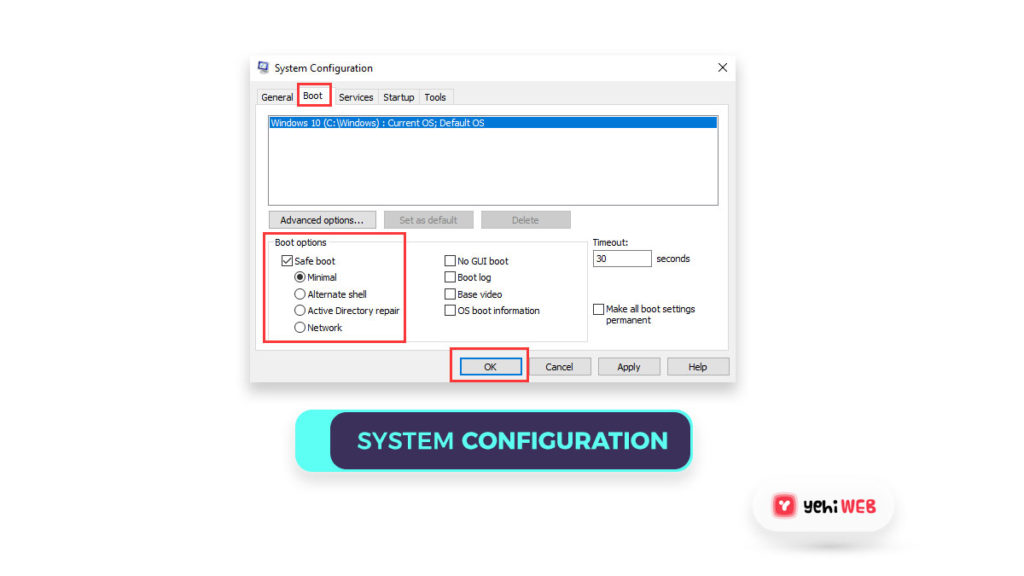
In general, you can Boot Windows 10 in Safe Mode with either the Minimal or Network options to troubleshoot problems with the system.
Note: When you use MSConfig to Boot Windows 10 in Safe Mode, your computer will start in Safe Mode every time you start it. Check out the section of this article about “How to Exit Safe Mode in Windows 10” for more information about how to exit Safe Mode.
3. Boot Windows 10 In Safe Mode With Start Menu
If you can log in to Windows 10, you can use the Start menu to boot into Safe Mode. Please follow the steps mentioned below to do so:
- On Windows 10, you can simultaneously press and hold the Shift key on the keyboard while clicking the Start menu. Then, in the Start menu, press the Power icon and select Restart.

- To get to the Startup Settings window, go to Troubleshoot -> Advanced options -> Startup Settings -> Restart after getting to the Choose an option screen.
- Boot Windows 10 in Safe Mode when restarting; press F4, F5, or F6 to choose a preferred Safe Mode option.
4. Boot Windows 10 in Safe Mode from Login Screen
If you can not log in to Windows 10 but can get to the sign-in page, you can enter Safe Mode in Windows 10 by pressing Shift + Restart from the login screen.
- When you are on the sign-in page, press and hold the Shift key, click the Power icon at the bottom right corner, and select restart.

- Once you are on the Choose a option screen, navigate to Troubleshoot -> Advanced options -> Startup Settings -> Restart.
- To Boot Windows 10 in Safe Mode when restarting, press F4, F5, or F6 to choose a preferred Safe Mode option.
5. Boot Windows 10 In Safe Mode from a Blank/Black Screen
If your Windows 10 system can not start normally, you can opt to start it in Safe Mode to troubleshoot issues.
To boot your Windows 10 PC in Safe Mode from a black or blank screen, you must first access the Windows Recovery Environment (WinRE) by turning the computer off and on three times.
Step 1: Access Windrows Recovery Environment (WinRE)
To turn off your computer, press and hold the Power button for 10 seconds, then press the Power button again to turn it back on. Press the Power button again for about 10 seconds to turn off the device as the computer is about to boot the operating system (e.g., the computer manufacturer’s logo appears when restarting).
Turn off and on your Windows 10 PC three times using the same procedure. The computer can now enter the Automatic Repair window as it is turned on for the third time. If not, repeat the process until the WinRE screen appears.
If the Automatic Repair does not fix your Windows 10 PC issues, click Advanced options to go to the Windows Recovery Environment screen and try any other options to fix it.
Step 2: Enter Windows Startup Settings
By clicking Troubleshoot -> Advanced options -> Startup Settings -> Restart in the WinRE browser, you can access the Startup Settings window.
Step 3: Boot Windows 10 In Safe Mode With Networking
Then press F5 to boot Windows 10 in Safe Mode with Networking. When you need to troubleshoot a black or blank computer screen, this is a recommended choice. Visit, How to Troubleshoot and Fix BSOD to look for more information and solution to errors you are facing on your Windows 10.
6. Boot Windows 10 In Safe Mode with F8 Key
Before signing in to Windows 7, press the F8 key repeatedly to access the Advanced options pane. We all know that this approach does not operate in Windows 10 and 8, since Windows 10/8 has a much faster boot time.
With the BCD (Boot Configuration Data) Edit command, you can make the F8 function again in Windows 10.
Step 1: Open Command Prompt As Administrator
Press Windows + R to open Run Window on your Computer. Then type cmd in the box and simultaneously press Ctrl + Shift + Enter to open Command Prompt as Administrator. Please do not just press OK because the Command Prompt (Admin) window will not open.

Step 2: Renable F8 Key Function
Then type bcdedit /set {default} bootmenupolicy legacy into the command prompt. And then press the Enter key.
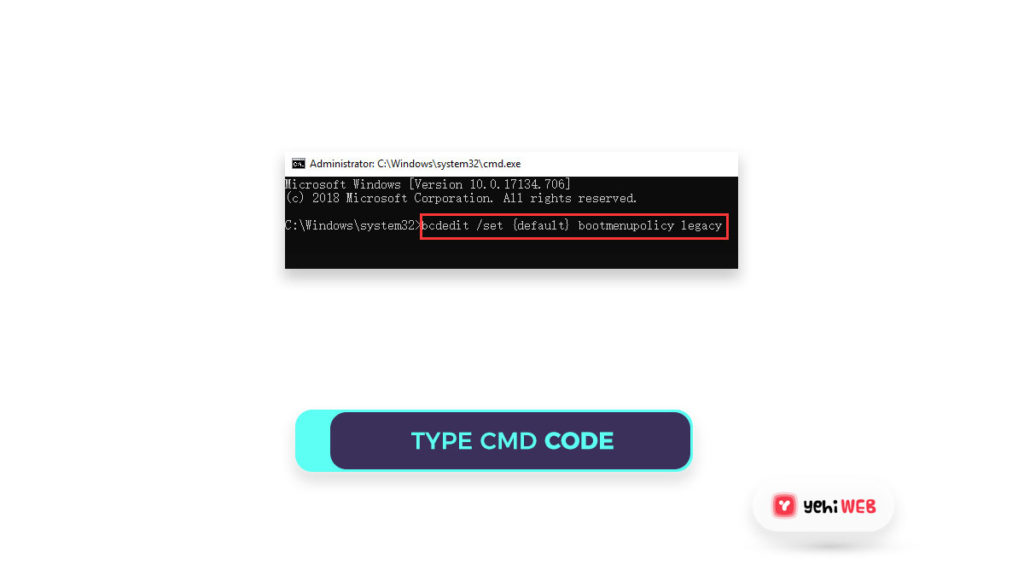
Step 3: Restart to Boot Windows 10 in Safe Mode
Close the Command Prompt window and restart your computer. You can now continuously click F8 to enter the Advanced Boot Options screen until the Windows logo appears.
You can then boot Windows 10 in Safe Mode, Safe Mode with Networking, or Safe Mode with Command Prompt by using the arrow keys on the keyboard.
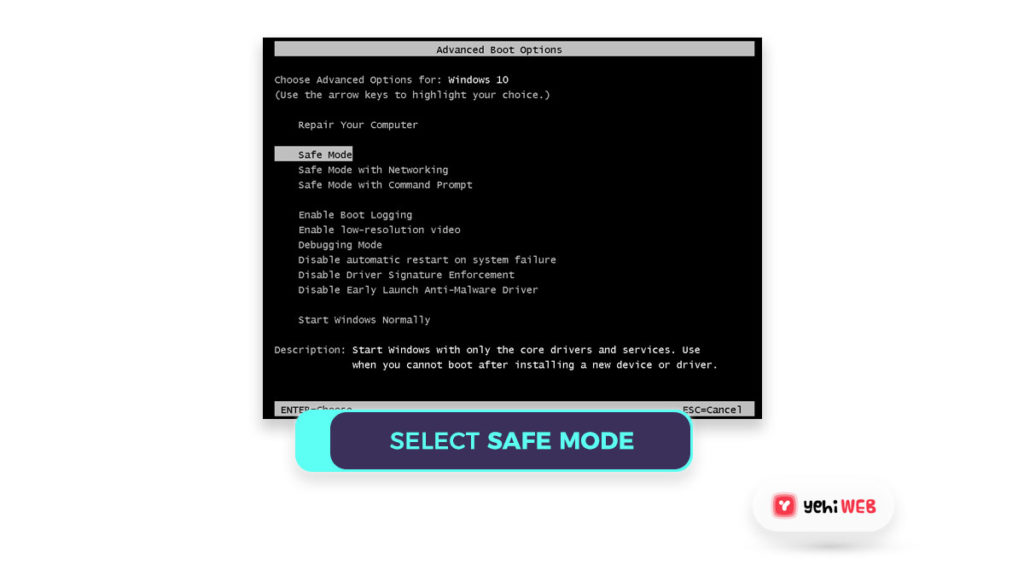
Note: Please keep in mind that you can only reactivate the F8 feature in Windows 10 if the computer can operate normally. If you are unable to access your Windows 10 PC, you can try the other methods mentioned in this article to boot into Windows 10 Safe Mode.
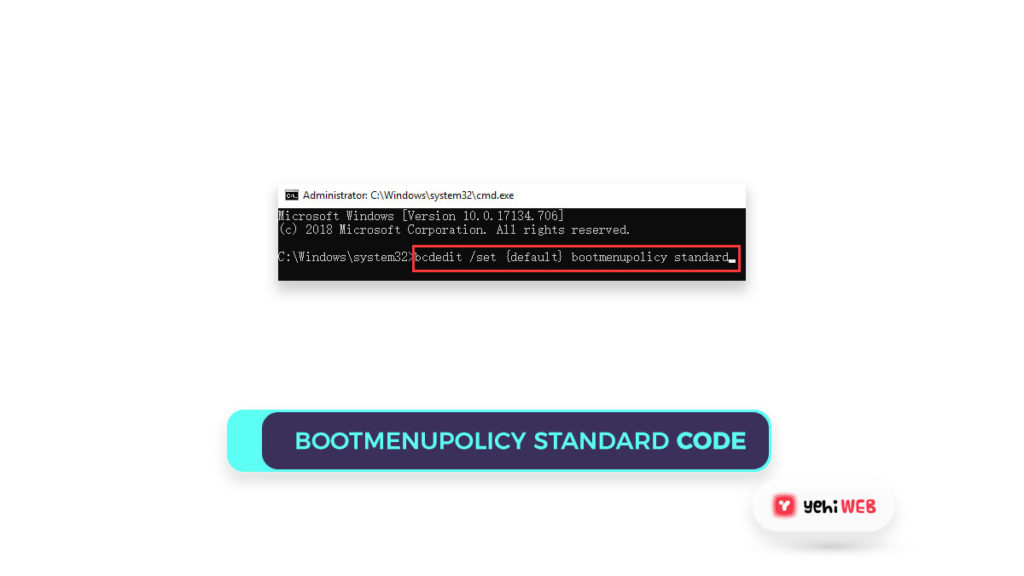
If you want to disable the F8 key in Windows 10, perform the same steps to open the Administrator Command Prompt window and type the following command: bcdedit /set {default} bootmenupolicy standard. Press Enter to restart the device.
7. How to Exit Safe Mode in Windows 10
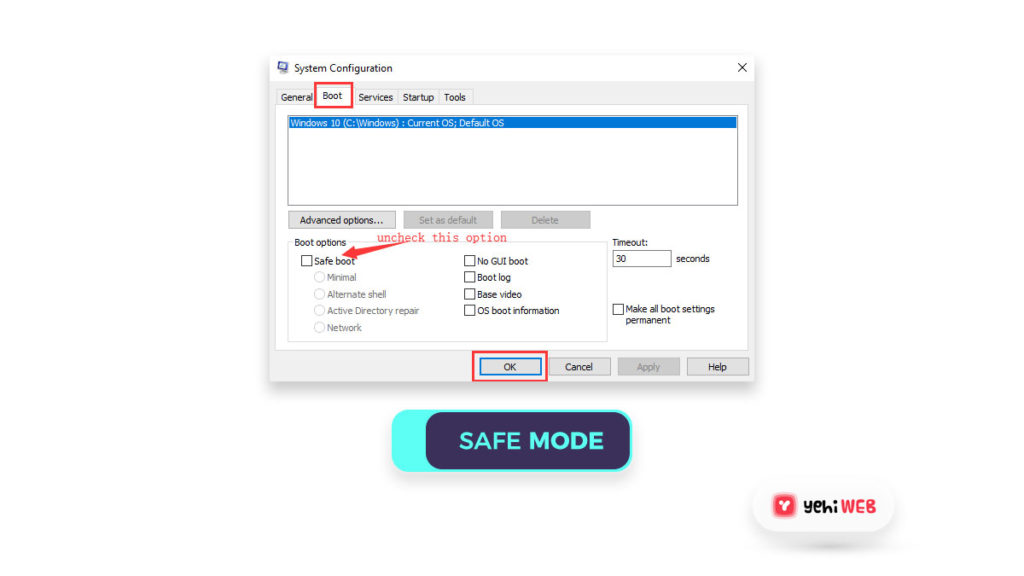
- You can do this by pressing the Windows and R keys on your keyboard. After that, type msconfig and press Enter to bring up the System Configuration window.
- Navigate to Boot Tab and uncheck the safe boot option. The next time you start your Windows 10 computer, it will boot into the normal screen.
8. Use Safe Mode To Fix Windows 10 PC Issues
Booting your Windows 10 PC in Safe Mode can assist you in resolving several computer issues.
1. Virus or Malware Removal
If your computer crashes or stops working as a result of a malware or virus infection, you should Boot Windows 10 in Safe Mode and scan for and remove the malware/virus.
You can also use Windows Defender in Windows 10 to scan for and remove malware and viruses from your computer. If your Windows 10 PC does not have an antivirus application installed, you can download and install one in Safe Mode only if you Boot Windows 10 in Safe Mode with Networking.
2. Uninstall Faulty Applications
If your Windows 10 computer can not start or run properly because of any recently installed programs with potentially conflicting drivers, you should uninstall faulty applications from the Control Panel in Safe Mode. After that, restart the computer to see if the issue has been resolved.
3. Restore Your System
If your Windows 10 computer has recently been unstable, you can use System Restore to return it to a previous state with a stable configuration. But what if Windows 10 System Restore gets stuck in Windows 10’s normal start mode? Then, to run a successful System Restore without crashing, Boot Windows 10 in Safe Mode.
In addition to the options mentioned above, you can Boot Windows 10 in Safe Mode to resolve issues such as the Kernel Data Inpage Error and others.
Final Thoughts
With step-by-step instructions, this article shows you how to Boot Windows 10 in Safe Mode (while booting). If your computer is not working properly, will not boot, or has other issues, you can try booting Windows 10 in Safe Mode to troubleshoot and resolve the issues.
Saad Shafqat
Related posts
New Articles
Wordle: The Puzzle That Turned Five Letters Into a Global Routine
Every morning, millions of people wake up and do the same small ritual. They grab coffee. They check their phones….

![How To Boot Windows 10 In Safe Mode [ Ultimate Guide ]](https://yehiweb.com/wp-content/uploads/2021/05/How-To-Boot-Windows-10-In-Safe-Mode-Ultimate-Guide-Yehiweb-1200x675.jpg)