![How To Increase Vram [Video Ram] on Windows PC](https://yehiweb.com/wp-content/uploads/2021/08/how-to-increase-video-ram-in-windows-yehiweb-1200x675.jpg)
A graphic card is the most critical hardware component of your PC. Because it affects your PC’s experience if it’s old and outdated, it won’t let you run the latest apps and games.
You are most likely to face a dreaded error notifying you that your PC doesn’t meet requirements. It’s devasting to get the error but rest assured we have an easy solution for you to resolve the error.
Solutions that do not need the purchase of new, costly hardware to improve the performance of your computer. When it comes to enhancing your computer experience for a better gaming experience, the best and easiest way is to upgrade your system’s configuration.
Find here how to increase Vram on Windows PC.
- Learn how to increase VRAM on Windows PC to take advantage of better image resolutions.
- Try entering BIOS and follow the steps outlined below to achieve your goal.
- Make sure to follow our simple instructions to determine how much VRAM you have.
- Rest assured, another simple way to increase VRAM on Windows PC is to use Registry Editor.
What is VRAM (Video Random-Acess Memory)?
Video Ram (VRAM) handles the majority of the problems caused by a bad graphics card. VRAM is a kind of RAM that stores information required by the GPU. It improves performance by allowing the GPU to get data and send it to your display.
The video RAM (VRAM) handles the majority of the problems caused by a bad graphics card. VRAM is a particular type of RAM that stores data that the GPU needs. It improves performance by allowing the GPU to get data and send it to your display quickly.
When it comes to GPU-related tasks, VRAM is much faster. VRAM was designed for this high-intensity activity and is much closer to the GPU. You’re well known that integrated graphics cards are cost-effective. Yet, they fall well short of the visual output of dedicated solutions. But, bear in mind that extra VRAM will not improve your computer’s performance.
If your VRAM is not enough, your system will have to rely on standard RAM. That leads to poor performance, lower frame rates, texture pop-ins, and other issues.
Frame buffering and texture mapping are both dependent on the VRAM. VRAM enables the GPU to render images at the highest possible rate and quality. This data is essential. This is why not having enough VRAM may ruin your gaming experience.
The GPU is tuned in its performance for several tasks. As such, an efficient memory is necessary to carry out these operations as fast as workable. Dedicated GPUs have their memory, unlike iGPUs (integrated graphics processing units). Take note that iGPUs share system memory.
In case you are unable to run certain games and apps due to insufficient Vram. You have few ways forward to resolve the issue and increase Vram on Windows PC.
How to Check Available VRAM (Video Ram) on your Windows PC?
It’s important to keep track of the real count before beginning the process of faking a VRAM increase. Here’s a simple guide to finding out how much video RAM (VRAM) your computer has.
Before you begin the process of faking a VRAM increase, you mustn’t lose track of the real count. Here’s a quick guide on seeing the amount of video RAM (VRAM) you have on your computer.
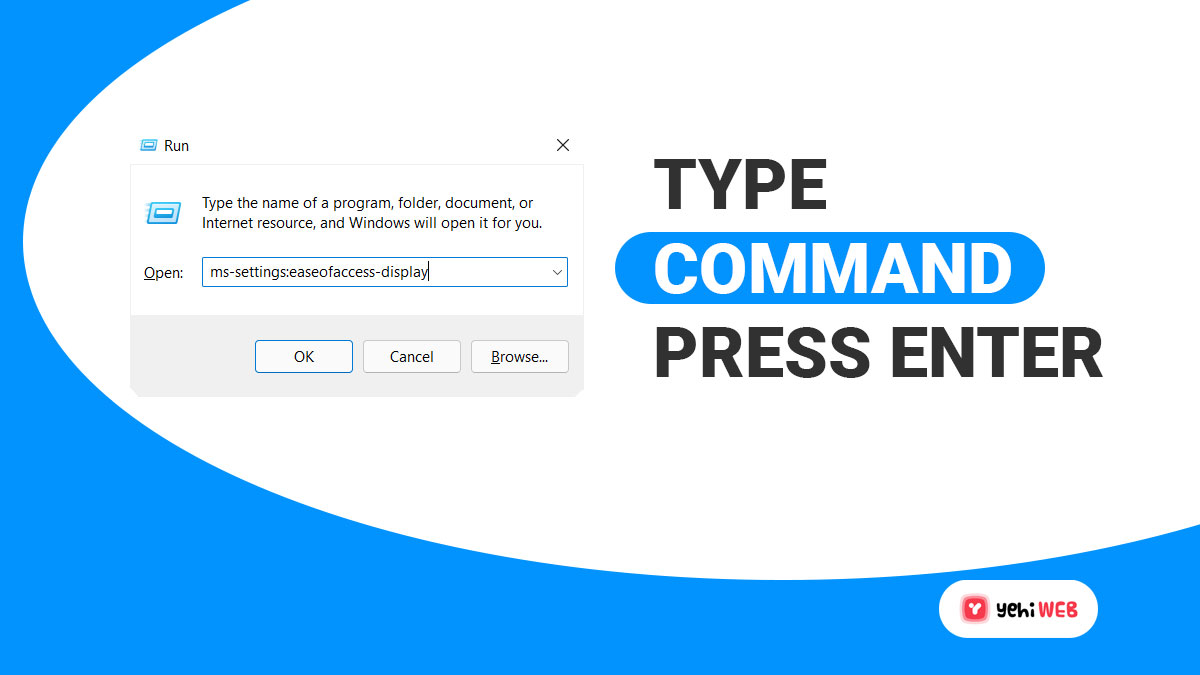
- Press Windows + R keys on your keyboard to launch the Run box. In the search field, type “ms-settings:easeofaccess-display” and hit enter. Doing so will launch the Display tab of the settings app.
- Scroll down and select Advanced display settings. Then, for Display 1, select Display adapter properties.
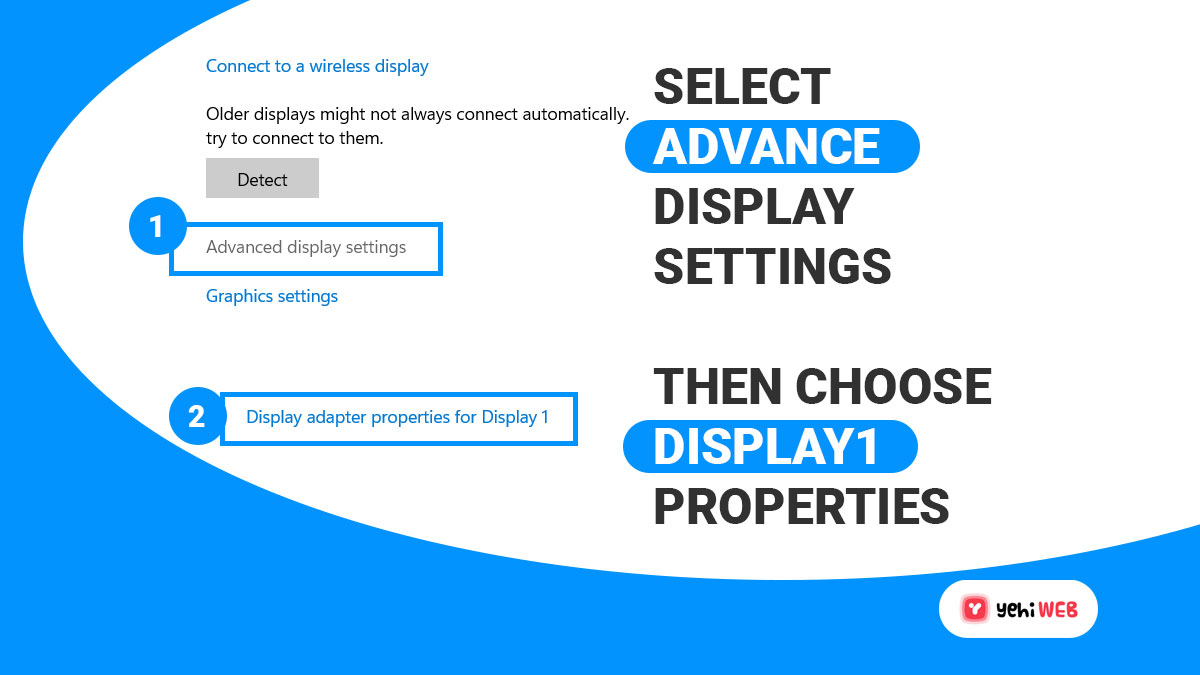
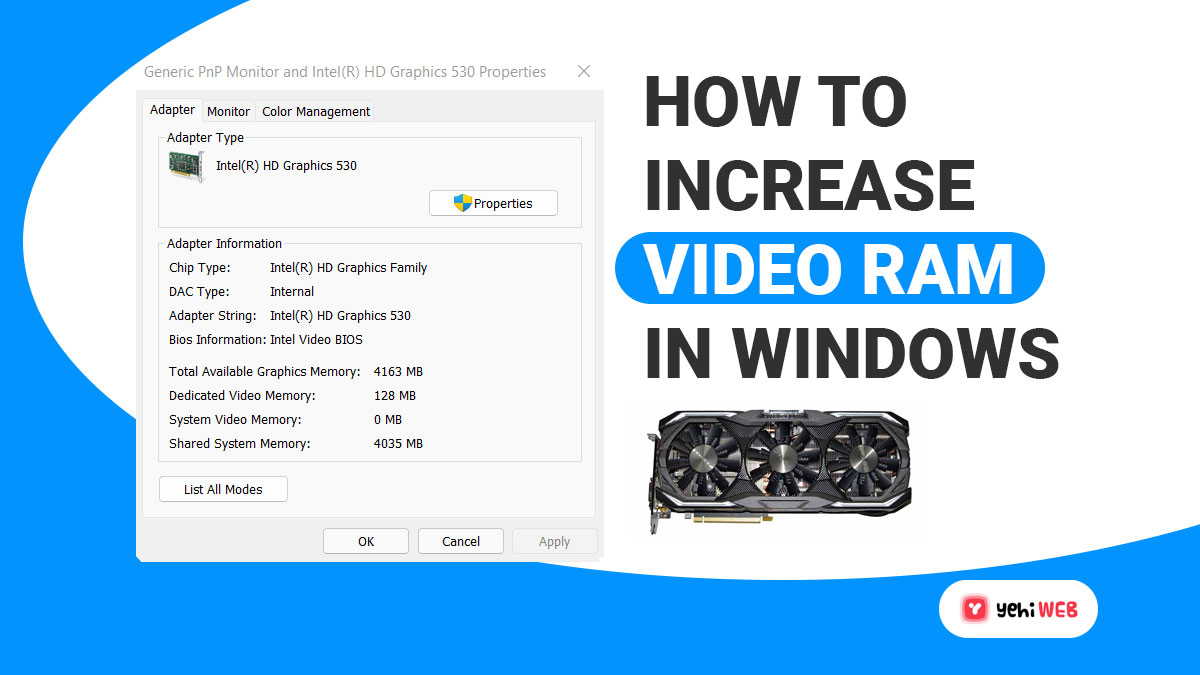
- You can see your VRAM count in the Adapter information section of Dedicated Video Memory. But, if you have both a dedicated GPU and an integrated graphics card, bear this in mind. If your computer is idle, the window will display the integrated solution.

Suppose you’re not sure if you’re using an integrated GPU or a dedicated graphics card. Then this screen will inform of that as well. And If you have an AMD Radeon Graphics Processor or an Nvidia GTX device listed as your Chip Type. Then you have a dedicated graphics card installed.
And if it says Intel HD Graphics or AMD Accelerated Processing Unit. Then you’re using onboard graphics. If it says Intel HD Graphics or AMD Accelerated Processing Unit, you might be able to increase your VRAM.
How To Increase VRAM on Windows PC?
If your system relies on the integrated graphics card or if you have a dedicated outdated GPU. The best way to increase VRAM on your PC is to buy a new graphics card.
Doing so will give a massive boost to your system’s performance. The method works if you have a good enough CPU and RAM to sustain the growth.
And in case you don’t have enough funds to go for an upgrade, there are few ways that you can use to increase VRAM on your PC. Feel free to use whichever method appears to be the most practical in your scenario.
Method #1: How to Increase VRAM Via Registry Editor?
Please take note that this method doesn’t increase VRAM. It tricks the game displays your specified amount of VRAM. But even if the method does not improve the performance of your system. It removes the restriction set by the game or app due to insufficient VRAM.
And there’s a reason why certain games restrict your system from launching them. Because due to insufficient VRAM, the game won’t be playable.
Modify Registry
- To launch the run box, press Windows + R, then type “Regedit” into the search field and press enter. Doing so will launch Registry Editor for you from where you can access the registry and edit them.

- From the left-hand side of the window, look for the ‘HKEY_LOCAL_MACHINE’ folder.
- After expanding it, look for the ‘SOFTWARE’ folder, then right-click the ‘Intel’ folder.

- Click on ‘New’ in the submenu, then ‘Key,’ which you will name ‘GMM.’

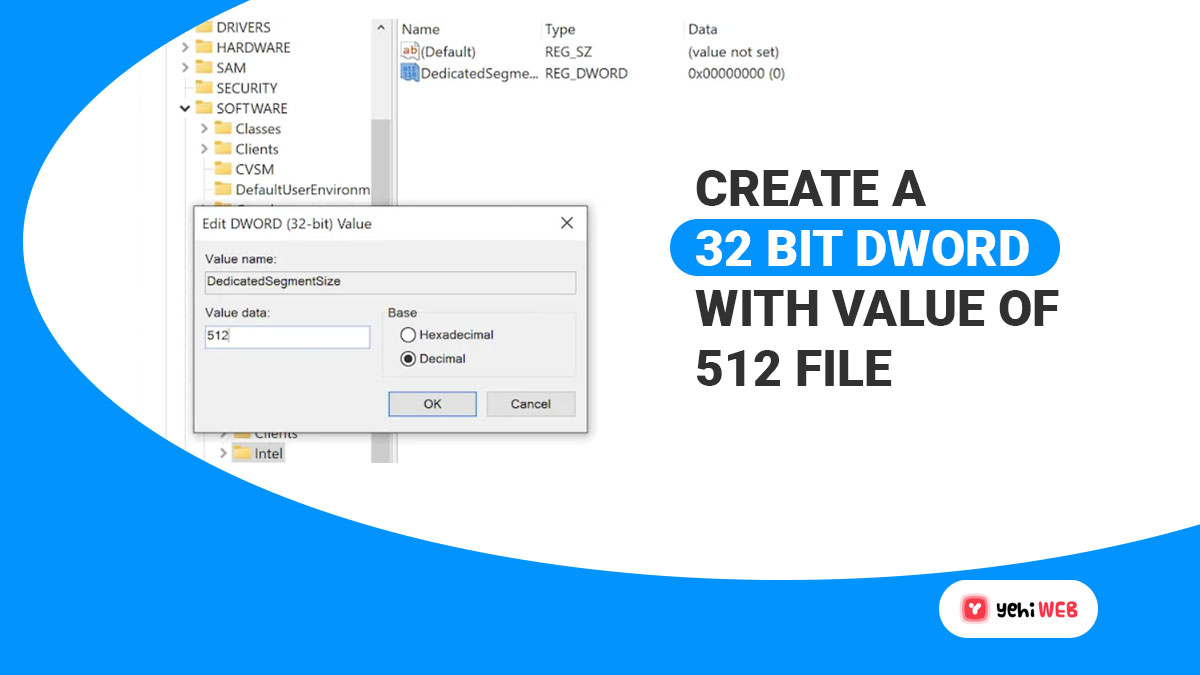
- Right-click on the GMM folder, select new, and then ‘DWORD (32-Bit) Value’ from the submenu. Name the new file file ‘DedicatedSegmentSize‘.
- Next, double-click on the registry you created; doing so will open a window. From the new window, you can change the value between 0 and 512. Be sure to select the decimal base.
- After clicking ‘OK,’ restart your computer, and then try to start your game again.
Method #2: How to Increase VRAM on PC via BIOS/UEFI?
This is the only way to increase VRAM legitimately. But you can’t push it past its limitations. It’s also worth noting that this feature is not accessible on all motherboards. But for the vast majority, it should be OK.
- Restart your computer.
- Press F2, F8, F9, F12, or Del key to enter in your system BIOS. Depending on your motherboard, you will have to press a different button to boot BIOS.

- Modern PC’s boot quicky, so you will have to be fast yourself to press the required button at the right time. The best method is to mash the button to boot BIOS the moment your computer restarts.
- Look for ‘Advanced Chipset Features’ or ‘Advanced Features’ once you’ve entered the BIOS. It depends on your motherboard. Once inside, search for ‘VGA Share Memory Size,’ ‘Graphics Settings, or ‘Video Settings.’
- Now change the ‘Pre-Allocated VRAM’ option to a higher value than you currently have. And there you have it: you have increased VRAM.
- Now Save the changes and exit BIOS. Next, let your computer boot up usually and check whether you have your desired VRAM.
Conclusion
The modern web revolves around video. As a result, there’s always a worthy cause to improve your video-playing power. Increasing your VRAM, which controls how much memory you have to work with, is a perfect place to start.
On a Windows system, you can do this using the BIOS or the registry. Select your option based on your needs and experience working under the hood of your machine.
FAQs
The DirectX Diagnostic Tool can help you figure out how much VRAM your video card has.
- Click on the “Start Menu” button.
- To open “DirectX Diagnostic Tool,” type “Dxdiag” into the search box and click enter.
- Navigate to the “Display” tab from the top of the “DirectX Diagnostic Tool” window.
- Under the “Device” heading, look for the text “Approx. Total Memory.”
Saad Shafqat
Related posts
New Articles

Best International SEO Trackers in 2026: Tools for Monitoring Global Rankings
International SEO in 2026 is no longer just about checking whether a keyword ranks in another country. Search results now…