Many of the fixes and tweaks you’ll find on the internet require you to run Command Prompt as an administrator. For non-technical people, this might be perplexing because many articles don’t explain how to access an elevated Command Prompt.
The majority of the time, simply starting a Command Prompt window as a regular user is sufficient. However, you’ll need administrator rights in some cases since you’ll need to conduct some operations in an elevated Command Prompt window.
What is an elevated Command Prompt?
The elevated Command Prompt mode appeared with Windows Vista and remained a core feature of the operating system until Windows 11. Microsoft limited the capability of specific commands to an elevated way exclusively to safeguard the user from potentially harmful instructions. This implies that some commands will only work if you run them from a Command Prompt with elevated privileges.
You can access an elevated Command Prompt in various ways, as you do with other Windows-related things. While You may apply most of the methods in this article to previous versions of Windows, bear in mind that it was written mainly for Windows 10 and Windows 11.
The following is a list of several ways to launch an elevated Command Prompt on Microsoft’s most recent operating systems.
Keep in mind that not all methods will work on Windows 10 and Windows 11 simultaneously. Check the label beneath each technique to check if it’s compatible with the Windows version you’re using.
Using the Start menu, open an elevated Command Prompt.
On every Windows version, this is the standard approach that most people adopt. It’s the most prolonged approach, but it’s also straightforward because everything is done through the user interface.
Here’s how to get an elevated Command Prompt from the Start menu:
- In the lower-left corner, select the Start menu. You can also achieve the same thing by pressing the Windows key.
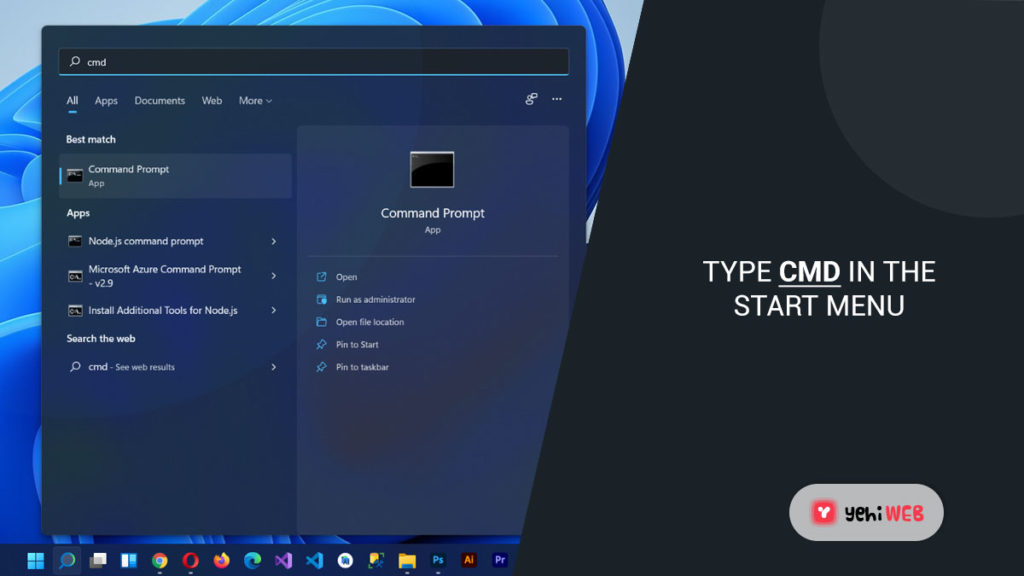
- To utilise the search feature automatically, enter the start menu and type “cmd.” Wait for the search results to appear, then right-click Command Prompt and select Run as Administrator from the context menu.
If you wish to avoid right-clicking, you can utilise the Ctrl + Shift + Enter keyboard sequence. This is the traditional method. If you’re searching for a faster solution, check out the alternative options below.
Using the Power User Menu, open an Elevated Command Prompt.
If you’re using Windows 10, you can use the Power User Menu to open an Elevated Command Prompt.
Keep in mind that in Windows 11, the Command Prompt (Admin) sub-menu is no longer available.
Right-click on the Start icon or press Windows key + X to open the Power User Menu. Then, to launch an Elevated Command Prompt, click on Command Prompt (Admin). A User Account Control (UAC) box will appear, prompting you to confirm the administrator permissions; click Yes to enter the Elevated Command Prompt.
Keep in mind that if you’ve installed the Creators Update on Windows 10, you’ll see Windows Powershell (Admin) instead of Command Prompt (Admin). Microsoft made this change to get more people to switch to Powershell. Windows Terminal is the equivalent of Windows 11. (Admin).
Note: If you wish to revert to the previous behaviour in Windows 10, see this article (here) on how to replace Windows Powershell (Admin) with Command Prompt.
However, you can also switch to an Elevated Command Prompt window by clicking on Windows Powershell (Admin) and typing “cmd” inside the Elevated Powershell window.
Open an Elevated Command Prompt using the Run box.
You can also use the run box to open an Elevated Command Prompt window. Usually, launching Command Prompt from the Run box does not give you administrator access, but there is a workaround.
To launch an Elevated Command Prompt window from the Run menu, use Windows key + R. Then, press Ctrl + Shift + Enter instead of pressing Enter to start the command prompt with administrative rights. After that, you’ll be prompted with a UAC (User Account Control) popup, which you must accept.
Create a shortcut to the elevated Command Prompt.
If you often use a Command Prompt command that requires administrator rights, it’s a good idea to create an Elevated Command Prompt shortcut. Although this is likely the most efficient method of launching an Elevated Command Prompt window, it does take some time to set up.
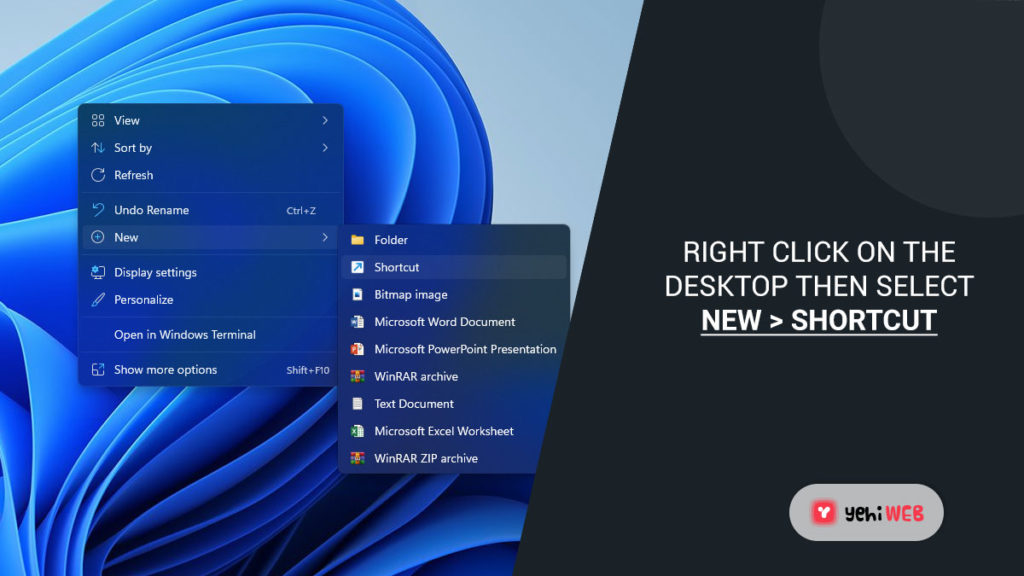
- Right-click anywhere on the desktop or in a folder and select New > Shortcut.
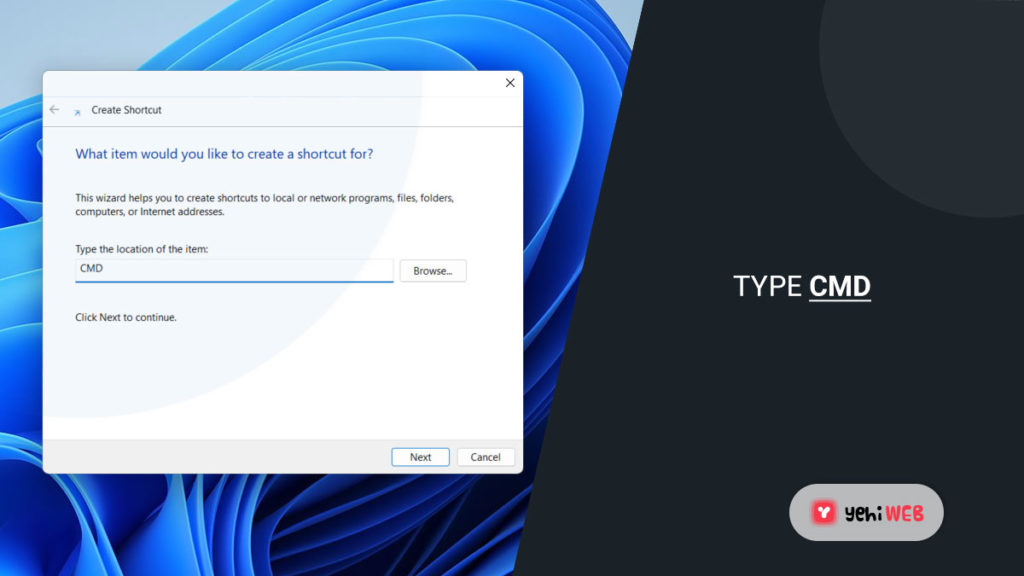
- Type ” CMD” in the field directly beneath “Type the item’s location” and press the Next button.
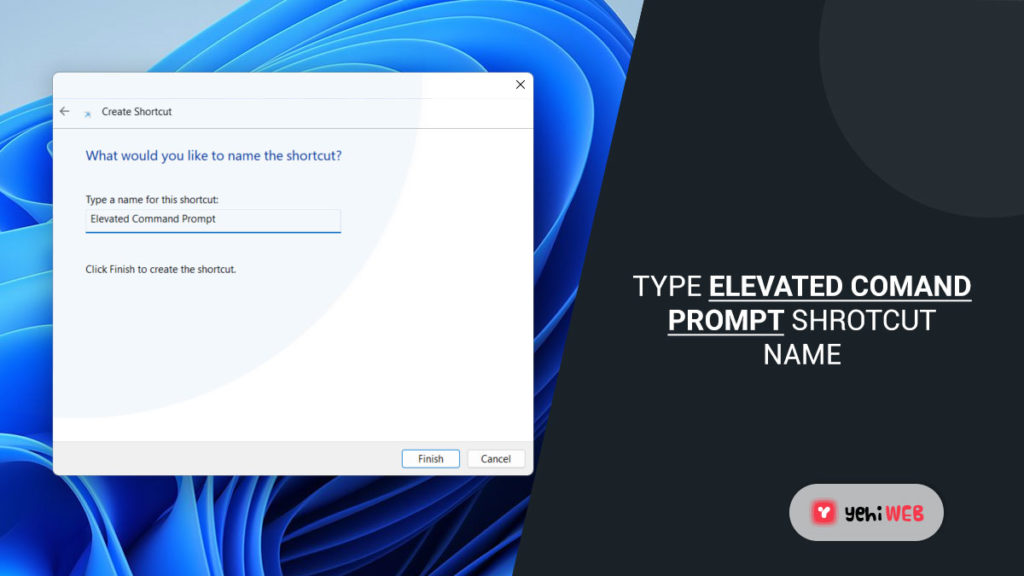
- Give the newly created shortcut a name, then click the Finish button to complete the procedure.
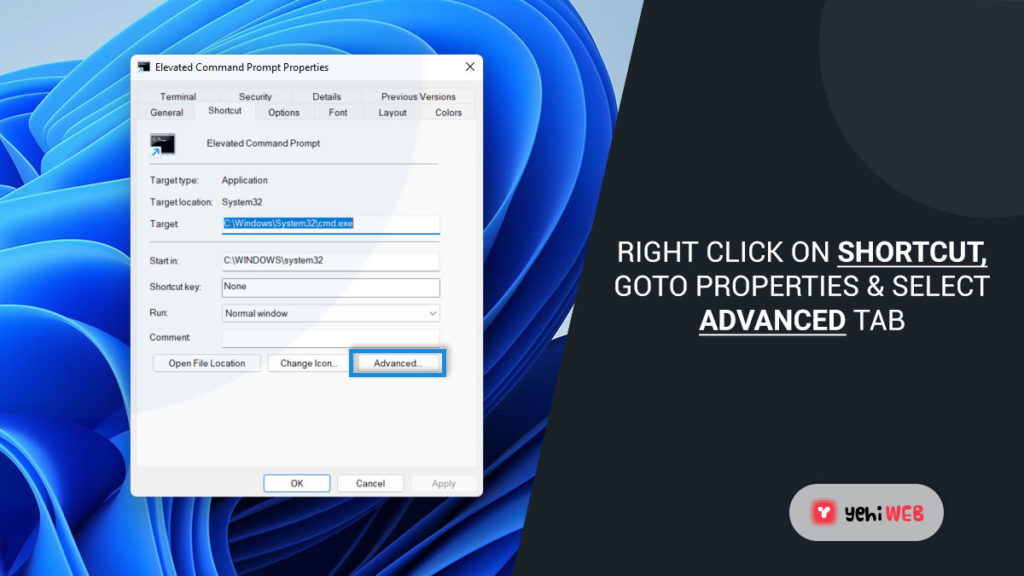
- Then, right-click on the newly generated shortcut and select Properties from the context menu. Then, on the Shortcut tab, select Advanced from the drop-down menu.
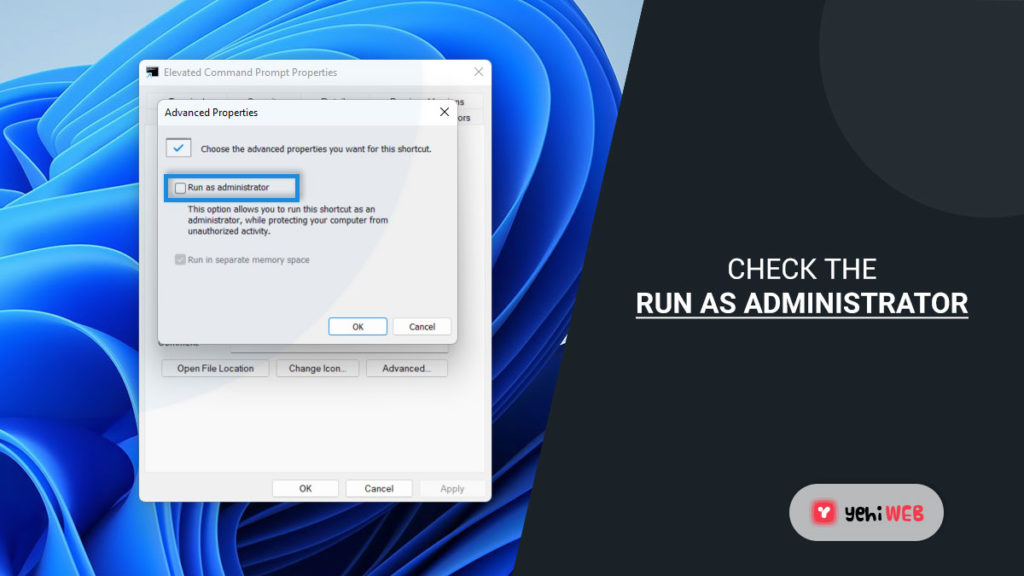
- Check the box next to Run as administrator in the Advanced Properties window and click OK. To save your changes, click Apply at the bottom of the page.
Using the Quick Link Menu, open a CMD Prompt.
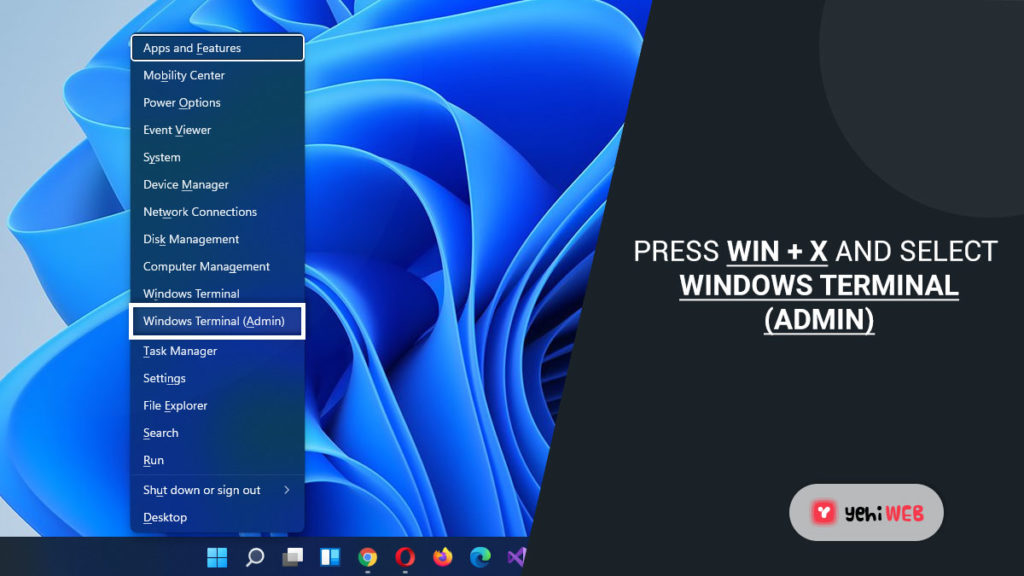
- On Windows 11, press the Windows key + X key to bring up the Quick Link menu.
- Now select Windows Terminal from the list of available alternatives (Admin).
Note that this is the latest version of the terminal software that comes with Windows 11. You may use it to run CMD and Powershell commands.
That is all there is to it. The Elevated Command Prompt window has been set up and is ready to use. Keep in mind that even if you set it to run with administrator privileges, the UAC box will question you.
Search for CMD commands in the Terminal App.
- On Windows 11, use the Windows key + S to access the Windows Search feature.
- Type Windows Terminal into the search window that just opened.
- Then, right-click on Windows Terminal from the list of results from the context menu and select Run as Administrator.
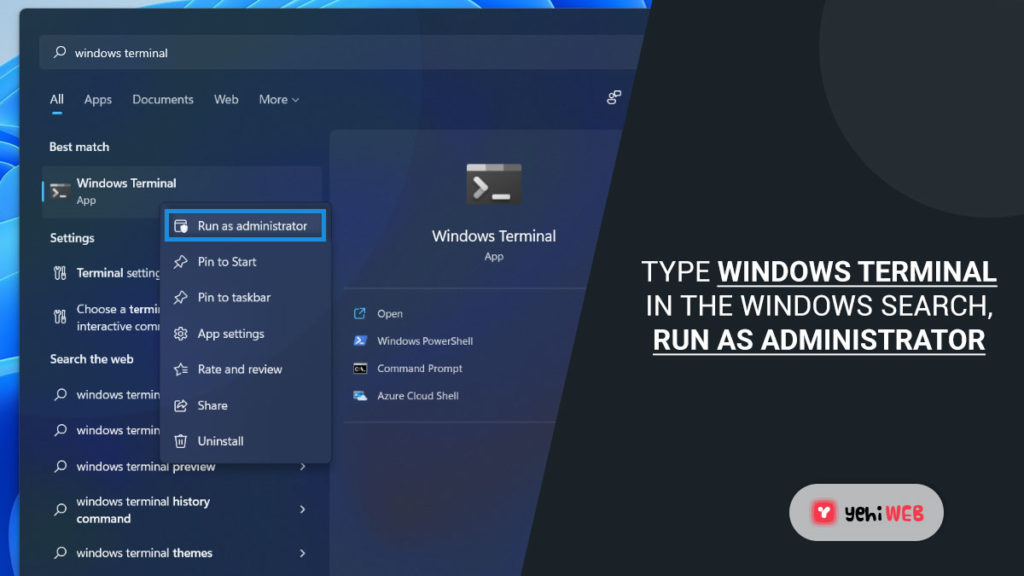
- Using the newly opened Windows Terminal app, run the CMD commands.
Execute CMD commands in the Windows Terminal launched via Task Manager
- Launch Task Manager by pressing Ctrl + Shift + Esc.
- If the simple interface has just appeared, click on More details once you’re within the Task Manager.
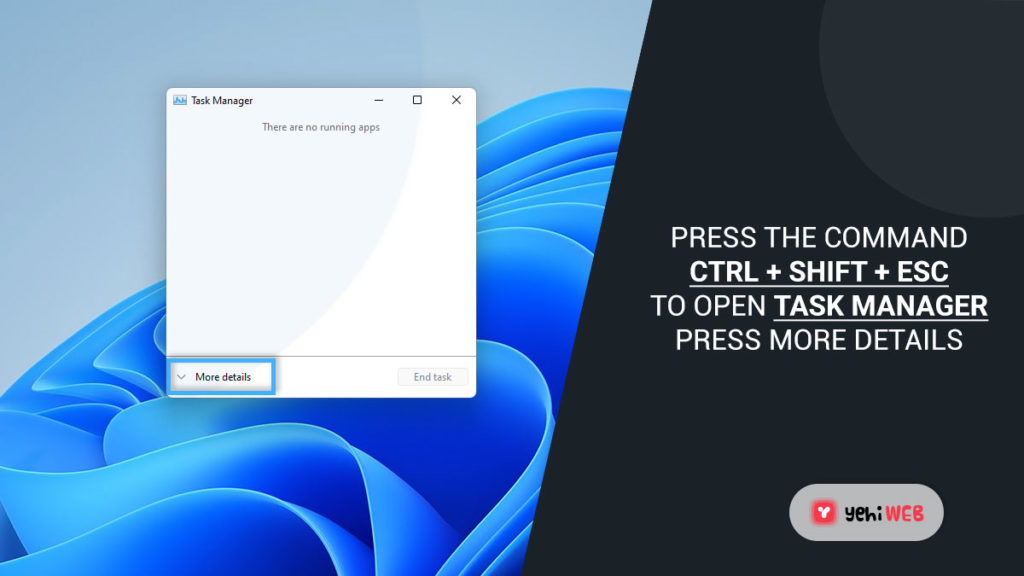
- Then, from the ribbon menu at the top, select File, Run New Task.
- Type ‘wt‘ into the newly appeared Create new task box, then check the box for Create this task with administrator rights before clicking OK.
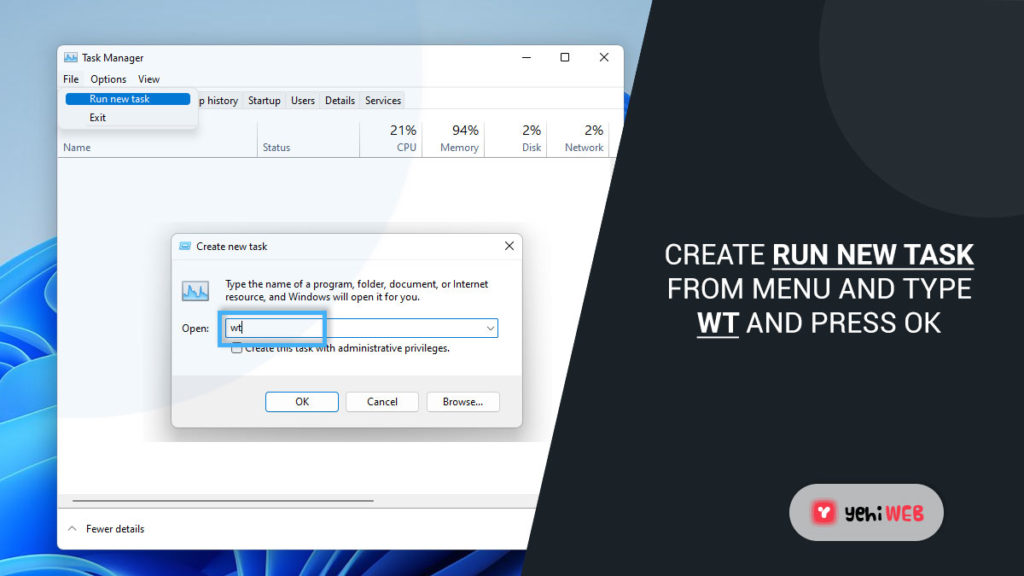
- You can enter your CMD commands once you’re within the Windows Terminal interface.
Run CMD commands in the Windows Terminal launched via Run Box.
- Launch the Run dialogue box by pressing Windows key + R.
- Launch Windows Terminal app with admin rights, by typing ‘wt‘ into the newly appeared Run box, and press Ctrl + Shift + Enter.
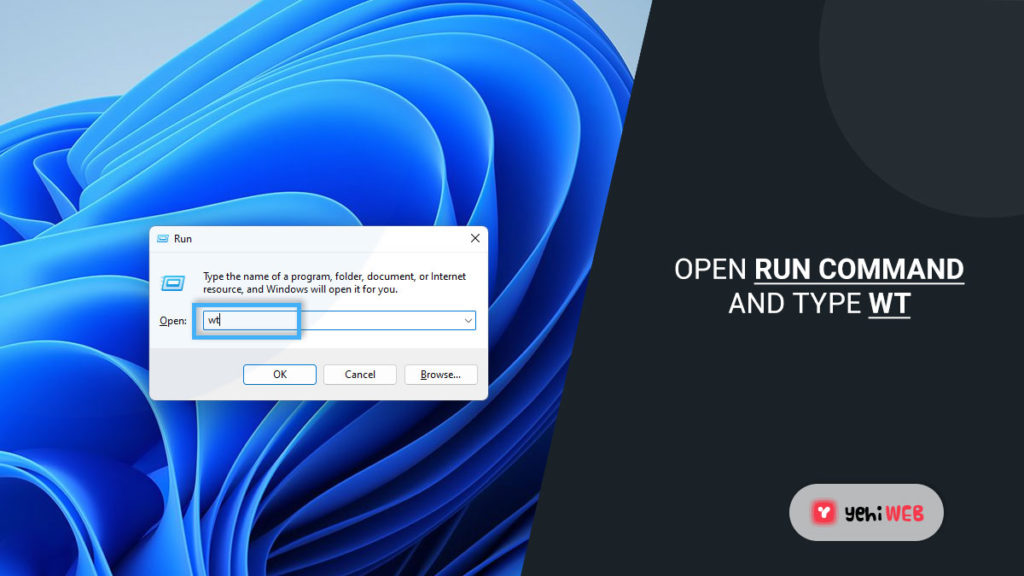
- Type the CMD commands as you normally would in the elevated Windows Terminal.
Bilal Shafqat
Related posts
New Articles
What is the difference between FMWhatsApp and GBWhatsApp?
In the world of messaging apps, WhatsApp reigns supreme as one of the most popular platforms for connecting with friends…

